-


求职秘籍
站-
热门城市 全国站>
-
其他省市
-
-

 15692118659
摘要:1 下载地址: www.scala-lang.org 2 这里下载的是 scala-2.11.1.msi, 本身就可以在window上运行,安装时要指定最好不要将scala安装到带有空格的路径,否则可能在运行“scala”命令的时候报“此时不应有 \scala\bin\scala.bat)。”的错误提示。 3 关于 idea支撑scala的配置,见 idea 集成 maven和scala.note。
1 下载地址: www.scala-lang.org
2 这里下载的是 scala-2.11.1.msi, 本身就可以在window上运行,
安装时要指定最好不要将scala安装到带有空格的路径,否则可能在运行“scala”命令的时候报“此时不应有 \scala\bin\scala.bat)。”的错误提示。
3 关于 idea支撑scala的配置,见 idea 集成 maven和scala.note
4 使用版本介绍:
scala版本:2.10.4 后面的spark也对应的scala这个版本, 最新版本 2.12.3
idea版本 14.1.1 ideaIC-14.1.1.exe
maven 版本3.3.3
jdk版本: 1.7
scala默认导入的三个包:
import java.lang._
import scala._
import Predef._
scala思想都是对象,因此没有基本数据类型, scala比Java面向对象更彻底,没有基础类型, scala奇妙的地方, 一切都是对象
scala 集合collection分为可变和不可变两种,
scala.collection.mutable
scala.collection.immutable
其中,默认创建的集合都是immutable collection types ,里面的集合都是定长、
scala的变量和常量赋值介绍:
scala语法是弱类型类似于js
一个是变量类型
一个是数值类型
scala变量定义:
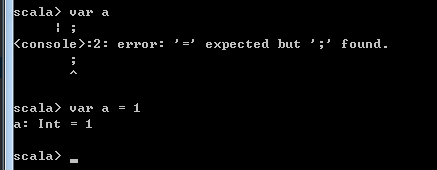
scala>var a = 1 类型会根据值自动推断
a: Int = 1
scala>var b = "hello" 类型会根据值自动推断, 注意只能是"" 不能是''
b: String = hello
常量定义:
scala>val c = 10 给常量复制后就不能再修改值了
c: Int = 10
在scala中是不允许只声明但是不给初始化赋值的, 如下例子,第一次只是定义了变量 a,但是没有赋值,在scala命令行中 var a 后会继续等待你输入,
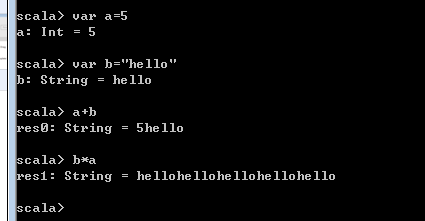
scala 好玩的样子:
scala> var a=5
scala> var b="hello"
scala> a + b
res4: String = 5 hello ----> scala中 允许*是一个方法名的, String类型有一个*的方法, 比如写成 b.*(a)
scala> b*a
在命令行中执行 scala :
HelloWorld.scala文件, 执行方式:
1 先编译,在执行, scalac HelloWorld.scala scala HelloWorld
2 直接执行 scala HelloWorld.scala
在配置了window机器的环境变量后,命令行cmd重启,就会把path重新加载一次。
在定义null的时候,只能是对var 变量来定义。
scala中调用Java类时,默认的Scala只会编译 这里目录的文件
<build>
<sourceDirectory>src/main/scala</sourceDirectory>
<testSourceDirectory>src/test/scala</testSourceDirectory>
<plugins>
如果scala文件中调用Java类,那么 可以手动将 这个Java类放在上面路径下让被编译到。
scala导包, 用_ 而不用* 比如写法如下:
import java.util.Arrays._
下面案例中 使用的 pom.xml如下:
Xml代码
1.      <project xmlns="//maven.apache.org/POM/4.0.0" xmlns:xsi="//www.w3.org/2001/XMLSchema-instance" xsi:schemaLocation="//maven.apache.org/POM/4.0.0 //maven.apache.org/maven-v4_0_0.xsd">
2.        <modelVersion>4.0.0</modelVersion>
3.        <groupId>com.ibeifeng.scala</groupId>
4.        <artifactId>scala_demo2</artifactId>
5.        <version>1.0-SNAPSHOT</version>
6.        <inceptionYear>2008</inceptionYear>
7.        <properties>
8.          <!-- 修改Scala的版本 -->
9.          <scala.version>2.10.4</scala.version>
10.    </properties>
11.
12.    <repositories>
13.      <repository>
14.        <id>scala-tools.org</id>
15.        <name>Scala-Tools Maven2 Repository</name>
16.        <url>//scala-tools.org/repo-releases</url>
17.      </repository>
18.    </repositories>
19.
20.    <pluginRepositories>
21.      <pluginRepository>
22.        <id>scala-tools.org</id>
23.        <name>Scala-Tools Maven2 Repository</name>
24.        <url>//scala-tools.org/repo-releases</url>
25.      </pluginRepository>
26.    </pluginRepositories>
27.
28.    <dependencies>
29.      <dependency>
30.        <groupId>org.scala-lang</groupId>
31.        <artifactId>scala-library</artifactId>
32.        <version>${scala.version}</version>
33.      </dependency>
34.      <dependency>
35.        <groupId>junit</groupId>
36.        <artifactId>junit</artifactId>
37.        <version>4.11</version>
38.      </dependency>
39.      <dependency>
40.        <groupId>org.specs</groupId>
41.        <artifactId>specs</artifactId>
42.        <version>1.2.5</version>
43.        <scope>test</scope>
44.      </dependency>
45.    </dependencies>
46.
47.    <build>
48.      <sourceDirectory>src/main/scala</sourceDirectory>
49.      <testSourceDirectory>src/test/scala</testSourceDirectory>
50.      <plugins>
51.        <plugin>
52.          <groupId>org.scala-tools</groupId>
53.          <artifactId>maven-scala-plugin</artifactId>
54.          <executions>
55.            <execution>
56.              <goals>
57.                <goal>compile</goal>
58.                <goal>testCompile</goal>
59.              </goals>
60.            </execution>
61.          </executions>
62.          <configuration>
63.            <scalaVersion>${scala.version}</scalaVersion>
64.            <args>
65.              <arg>-target:jvm-1.5</arg>
66.            </args>
67.          </configuration>
68.        </plugin>
69.        <plugin>
70.          <groupId>org.apache.maven.plugins</groupId>
71.          <artifactId>maven-eclipse-plugin</artifactId>
72.          <configuration>
73.            <downloadSources>true</downloadSources>
74.            <buildcommands>
75.              <buildcommand>ch.epfl.lamp.sdt.core.scalabuilder</buildcommand>
76.            </buildcommands>
77.            <additionalProjectnatures>
78.              <projectnature>ch.epfl.lamp.sdt.core.scalanature</projectnature>
79.            </additionalProjectnatures>
80.            <classpathContainers>
81.              <classpathContainer>org.eclipse.jdt.launching.JRE_CONTAINER</classpathContainer>
82.              <classpathContainer>ch.epfl.lamp.sdt.launching.SCALA_CONTAINER</classpathContainer>
83.            </classpathContainers>
84.          </configuration>
85.        </plugin>
86.      </plugins>
87.    </build>
88.    <reporting>
89.      <plugins>
90.        <plugin>
91.          <groupId>org.scala-tools</groupId>
92.          <artifactId>maven-scala-plugin</artifactId>
93.          <configuration>
94.            <scalaVersion>${scala.version}</scalaVersion>
95.          </configuration>
96.        </plugin>
97.      </plugins>
98.    </reporting>
99.  </project>
Java代码
1.      scala  Array知识点整理:
2.
3.      1 定义数组两个方式:
4.         var a = new Array[Int](3) , []中是数据类型(可以去掉),()中是数组长度 表示定义长度为3的一个数组
5.         var a = Array[Int](1,2,3,4)   不使用new定义数组时,[]中是数据类型(可以去掉),()中初始化数组的值,表示这个数组里值为 3,4,5,6
6.
7.      数组: Array
8.      变长数组: ArrayBuffer
9.
10.  ++= 是增加数组的
11.  --= 减少数组
12.  定长数组.toBuffer 变长变长数组
13.
14.  数组是以下标0开始的  var a = ArrayBuffer(1,2,3,4)
15.  变长数组增加字段:  a+=5  a.insert(1,11)
16.  变长数组修改字段  a(0) = 0
17.  变长数组删除字段: a-=3  会直接将里面元素为3的删除掉
18.
19.  数组迭代:
20.  var b = for(tmp <- a if(tmp%2==0)) yeild tmp
21.   b.foreach(println)
22.
23.  数组排序:
24.  a.sorted
25.
26.
27.  --------------------------------------------------------------------------------
28.
29.  for  break continue:
30.
31.  定义函数:
32.    def demo02(): Unit = {...} 注意Unit可以理解为void, 如果函数是要返回值的,def demo02(): Int = {...函数最后一行为返回值}
33.
34.
35.
36.  i <- a to b 表示范围    [a,b]  for循环  for(tmp <- 0 until length)
37.  i <- a until b 表示范围  [a,b) for循环
38.
39.  for的推导式: for(tmp <- a.reverse)
40.  for的守位:  for(tmp <- a.reverse; if tmp %2 == 0)     for(tmp <- 0 to (length,2)) 2表示步长
41.  for增加break :  var _break = new Breaks  _break.breakable {for循环{if(xxx){_break.break()}}}  _break.breakable需要整个包住for循环
42.  for中的continue:  var _break = new Breaks  for循环{_break.breakable {if(xxx){_break.break()}}}  _break.breakable仅需要包住在要跳出的地方
43.
44.  --------------------------------------------------------------------------------
45.
46.
47.  List :
48.
49.  定义的两种方式:
50.   var list1 = List(1,2,3,4)  或者 var list2 = 0::1::2::3::Nil   list2 = list2 :+ 4
51.  var list1 =  new ListBuffer[Int] list1 += 1
52.
53.
54.  --------------------------------------------------------------------------------
55.
56.
57.  元组:
58.  // 元组定义, 里面可以有多个数值类型 , 在获取的时候 用 _1 _2 _3这种方式获取 并且下标从1开始
59.  def test2(): Unit = {
60.    var p1 = ("hello", 33, 19)
61.    println(p1._1  )
62.  }
63.
64.  --------------------------------------------------------------------------------
65.
66.  case match   +  模式匹配
67.
68.  // 模式匹配的值匹配 增加首位_ 这个占位符
69.    def test3(): Unit = {
70.      val a = 3
71.      val b = a match{ // _可以理解为占位符,表示参数a有多个值的时候,那么用_表示多个 如果a就一个值 比如 4那么直接写出4即可
72.        case _ if a>=0 && a<4  => "小于4"
73.        case   4 =>"等于4"
74.        case _ => "大于4"
75.      }
76.      print(b)
77.    }
78.
79.  // 模式匹配的类型匹配
80.  def test4(): Unit = {
81.    val num:Any="1"
82.    num match {
83.      case i:Int => println("this is Int")
84.      case s:String => println("this is String")
85.      case _ => print("this is not Int and String, is other")
86.    }
87.
88.  }
89.
90.
91.    // 数组的模式匹配
92.    def test5(): Unit = {
93.      val array = Array(1,2,3)
94.
95.      array match {
96.        case Array(1,2) => println("Array(1,2)")
97.        case Array(1,2,_) => println("Array(1,2,_) 三个参数")
98.        case Array(1,2,_*) => println("Array(1,2,_*) 三个以上参数")
99.        case _ => print("不识别")
100.       }
101.
102.     }
103.
104.   --------------------------------------------------------------------------------
105.
106.   map:
107.
108.   1 定义: var map1 = Map("zhangsan"->23,"lisi"->32)   map1.getOrElse("zhangsan1","no having")
109.   2 增加元素: map1+=("wangwu"->33)
110.   3 删除元素: map1-=("zhangsan")
111.   4 修改元素; map1("lisi")=40
112.   5 遍历: for((k,v) <- map1) for(tmp <- map1) for( k <- map1.keys)  for( v <- map1.values)
113.
114.   --------------------------------------------------------------------------------
115.
116.   自定义函数和集合的 map()方法使用,
117.
118.   集合的map()方法就是将 集合中的每一个元素 打散后来一个个处理
119.
120.   1 自定义函数:
121.    def mytoupcase(a:String): String ={
122.       a.toUpperCase()
123.     }
124.
125.
126.
127.       // 定义函数 可变参数,  *表示有多个参数
128.     def sum1(x:Int*): Int = {
129.       var c = 0
130.       for(a<-x) {
131.         c=c+a
132.       }
133.       return c // return 可以有 可以不写, 定义的函数中,最后一行表示返回值
134.     }
135.
136.
137.   2 集合的map()方法 :  此方法会把集合的所有元素得到并进行处理
138.   var list = List("a" ,"b","c")
139.   var newList = list.map(_.toUpperCase) // _表示集合所有元素
140.
141.   // 隐式调用
142.   var newList = list.map(mytoupcase)  //  调用集合的map函数,在函数中因为集合就一个个的元素,因此在传递给自定义函数mytoupcase时直接省略传参
143.   // 显示调用
144.   var newList = list.map(tmp => mytoupcase(tmp))
145.
146.
147.    // 定义函数,实现字母大写
148.     def mytoupcase(a:String): String ={
149.       a.toUpperCase()
150.     }
151.
152.   --------------------------------------------------------------------------------
153.
154.   集合rededuce() 方法 :
155.
156.    // reudceleft : 集合元素从左到右 依次按照函数来操作, 从左向右进行聚合 (聚合:多个值变成一个值)
157.     def test1() : Unit ={
158.      // var result = List(1,2,3,4,5).reduceLeft(_-_) // 匿名函数, 左边数字 - 右边数字
159.      var result = List(1,2,3,4,5).reduceLeft((x,y)=>x-y)
160.       println(result)
161. } 喜欢 | 0
 不喜欢 | 0


您输入的评论内容中包含违禁敏感词
我知道了

请输入正确的手机号码
请输入正确的验证码
您今天的短信下发次数太多了,明天再试试吧!
我们会在第一时间安排职业规划师联系您!
您也可以联系我们的职业规划师咨询:

版权所有 职坐标-一站式AI+学习就业服务平台 沪ICP备13042190号-4
上海海同信息科技有限公司 Copyright ©2015 www.zhizuobiao.com,All Rights Reserved.
 沪公网安备 31011502005948号


 资料领取
资料领取

 答疑解惑
答疑解惑

 技术交流
技术交流

 职业测评
职业测评

 面试技巧
面试技巧

 高薪秘笈
高薪秘笈